
How to Build a Website for Dropshipping and E-Commerce (Beginner’s Guide)
In this step-by-step guide, I share the exact tools I used, from choosing Shopify or WooCommerce to setting up products, payments, and apps. Whether you’re launching your first dropshipping store or testing print-on-demand, this guide shows you how to get online quickly and start selling.
When I first thought about launching a dropshipping store, the idea of building the actual website felt intimidating. I pictured complex code, endless design tweaks, and weeks before anything was live. The truth? Building a website for e-commerce has never been easier.
You don’t need to be a developer or spend thousands of dollars. With the right tools, you can have a functioning online store in a weekend. In this guide, I’ll walk you through the exact steps to get started, the platforms I tried, and what I wish I knew earlier.
This guide is for those of you who have their sales niche and potential suppliers sorted out, if that’s not you, check out my E-Commerce and Dropshipping 101 Guide to get started.
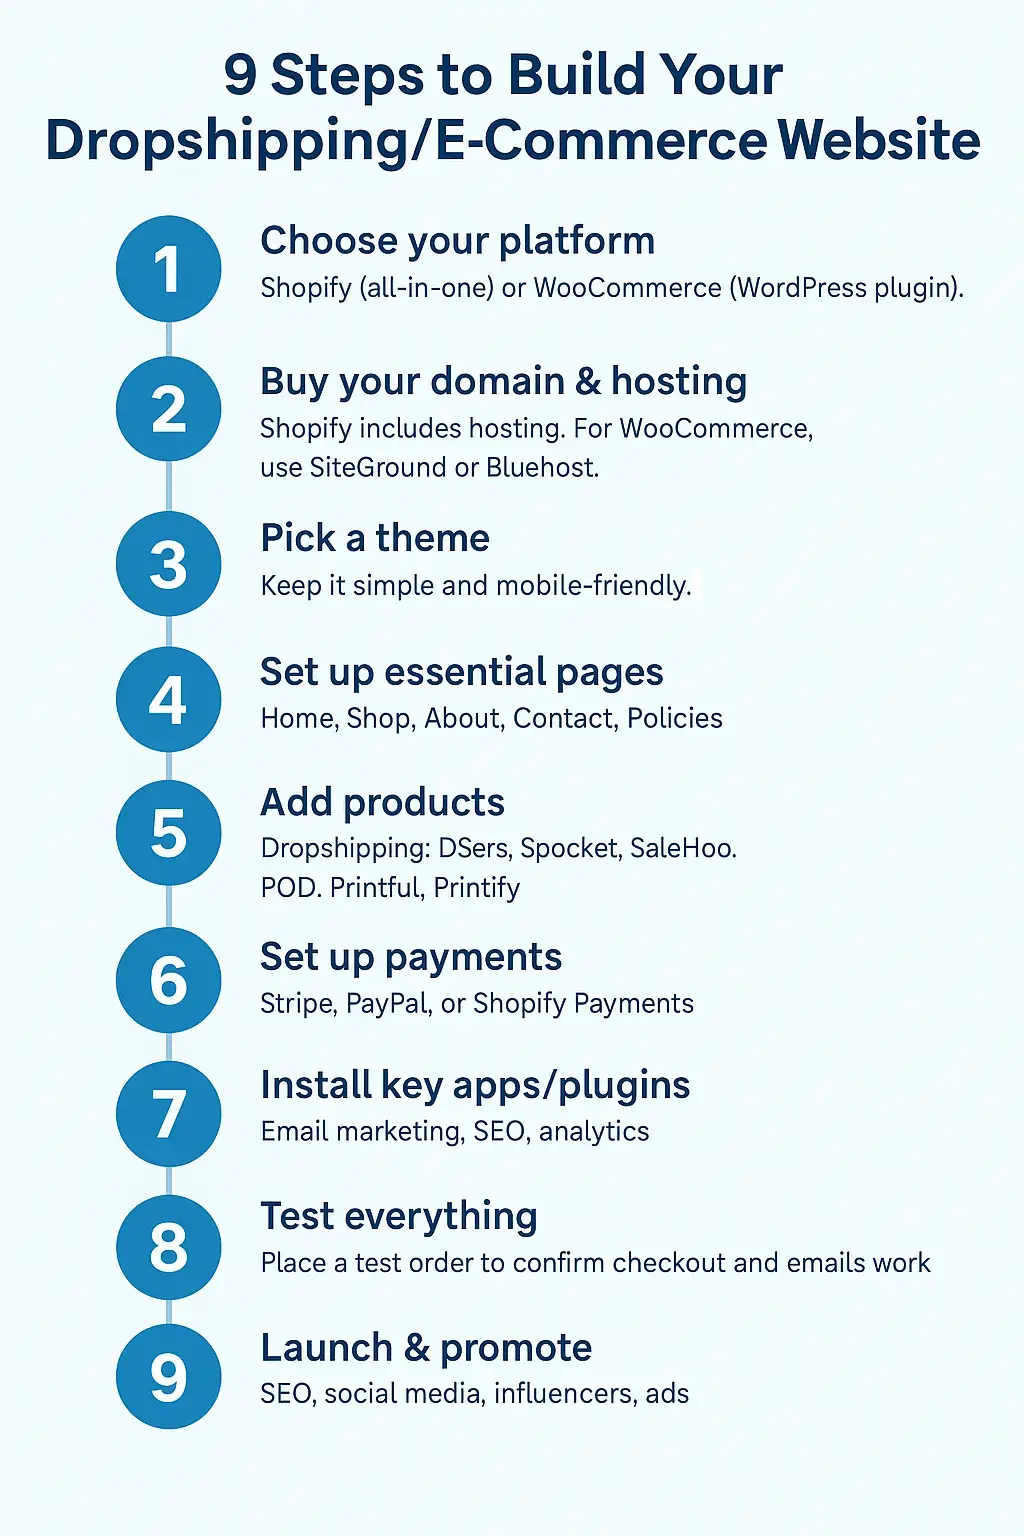
Step 1: Choose Your E-Commerce Platform
This is the backbone of your store – the software that powers your website, product listings, checkout, and payments.
The two most popular options are:
Shopify
- Best for beginners who want everything in one place.
- Easy setup with drag-and-drop design tools.
- Built-in payment processing, security, and hosting.
- Massive app store for adding features.
- Starts at $39/month.
If you want speed and simplicity, Shopify is hard to beat. You can pick a theme, add products, and be live in hours.
👉 For a deeper breakdown, check out my Shopify vs WooCommerce comparison.
WooCommerce (WordPress)
- Best for flexibility and lower costs at the start.
- Free plugin that turns a WordPress site into a store.
- Huge number of themes and plugins to customize.
- You’ll need separate hosting (SiteGround, Bluehost, etc.).
- Steeper learning curve but more control.
I started with WooCommerce because I already had a WordPress site, but I eventually tested Shopify for the all-in-one convenience. Both work, but beginners often find Shopify less overwhelming.
Step 2: Secure Your Domain and Hosting
Your domain is your web address (like mystorename.com). Hosting is where your site lives online.
- If you choose Shopify, hosting is included. You just buy a domain through Shopify or a registrar like Namecheap or Google Domains (usually $10–$15/year).
- If you choose WooCommerce, you’ll need hosting. Popular beginner options:
- SiteGround – fast and reliable.
- Bluehost – budget-friendly with 1-click WordPress install.
Step 3: Pick a Theme and Customize Your Store
This is where your website starts to look real.
- Shopify: Comes with free themes like Dawn. You can also buy premium themes ($150–$300) for more polish.
- WooCommerce: Start with free themes like Storefront or Astra. Upgrade later if you want.
When customizing, keep it simple:
- Clean navigation (Home, Shop, About, Contact).
- Consistent colors and fonts.
- Big, clear product images.
I spent way too much time tweaking colors when I started. Your customers care more about product quality and trust than whether your buttons are blue or green.
Step 4: Set Up Essential Pages
Before you list products, make sure your website has the basics covered:
- Homepage – a clear headline and featured products.
- Shop page – where all your items are displayed.
- Product pages – detailed descriptions, photos, and “Add to Cart” buttons.
- About page – your story, mission, or brand angle (especially important for POD).
- Contact page – email form or support details.
- Policies – privacy policy, refund/returns, and shipping info.
Shopify and WooCommerce both let you generate template policies quickly.
Step 5: Add Products
Here’s where things get exciting.
- For dropshipping, you’ll import products directly from suppliers using tools like:
- DSers (Shopify app that connects with AliExpress).
- Spocket (focuses on US/EU suppliers for faster shipping).
- SaleHoo (directory of vetted suppliers).
- For print-on-demand, you’ll connect apps like:
Each app syncs with your store, so when a customer orders, the supplier automatically fulfills it.
Step 6: Set Up Payments
People need to pay you! Luckily, both Shopify and WooCommerce make this easy:
- Shopify Payments – built-in, supports major cards and wallets.
- PayPal and Stripe – easy to integrate with either platform.
Most beginners stick with PayPal and Stripe since they’re trusted and straightforward.
Step 7: Install Key Apps and Plugins
Don’t overload your site with apps, but a few essentials help:
- Email marketing – connect Mailchimp, ConvertKit, or Brevo (see my Email Marketing Platforms Guide).
- SEO plugin (if on WordPress) – Yoast SEO or Rank Math (see my SEO and Keyword Research Guide).
- Analytics – Google Analytics or Shopify Analytics to track sales and visitors.
- Trust signals – reviews app, currency converter, or shipping timers (use lightly).
Step 8: Launch and Test
Before you announce your store to the world, place a test order. Check that:
- Products show correctly.
- Checkout works smoothly.
- Emails (order confirmation, shipping updates) send properly.
Fixing little hiccups early will save you customer headaches later.
Step 9: Drive Traffic to Your Store
A website without visitors won’t sell anything. As a beginner, I’d recommend focusing on one or two main channels:
- SEO: Optimize product pages for keywords. Example: “eco-friendly water bottle” instead of just “water bottle.” See my SEO and Keyword Research Guide.
- Paid ads: Test small budgets on Facebook, Instagram, or TikTok to validate products.
- Content marketing: Start a blog (WordPress makes this easy) or post on TikTok/Instagram Reels.
- Influencers: Send free products to micro-influencers in your niche.
For a full breakdown, see my Guide for Marketing Your Website or E-Commerce Store.
Beginner Mistakes to Avoid
- Adding too many products: Start with 5–10 core items, not 200.
- Ignoring mobile design: Most shoppers browse on phones.
- Skipping policies: Customers want to know shipping and return rules.
- Expecting instant sales: It takes time and testing to find a winning product.
My Personal Experience
When I built my first dropshipping site, I went with WooCommerce to save money. I quickly learned that while it’s cheaper, you spend more time managing plugins and updates. Later, I tested Shopify and realized the extra monthly fee was worth the simplicity.
If I were starting again today, I’d go with Shopify for speed and reliability. WooCommerce is still a great choice if you’re comfortable with WordPress or want long-term flexibility.
Final Thoughts
Building a website for dropshipping or e-commerce isn’t as scary as it seems. With platforms like Shopify and WooCommerce, you can get online fast and focus on what really matters – choosing the right products and driving traffic.
Start small, test your setup, and remember that the real learning comes after launch. You don’t need the “perfect” website to begin. You just need a functional one that customers can trust.